
Sardinian Decorative Semolina Bread | Pane Coccoi
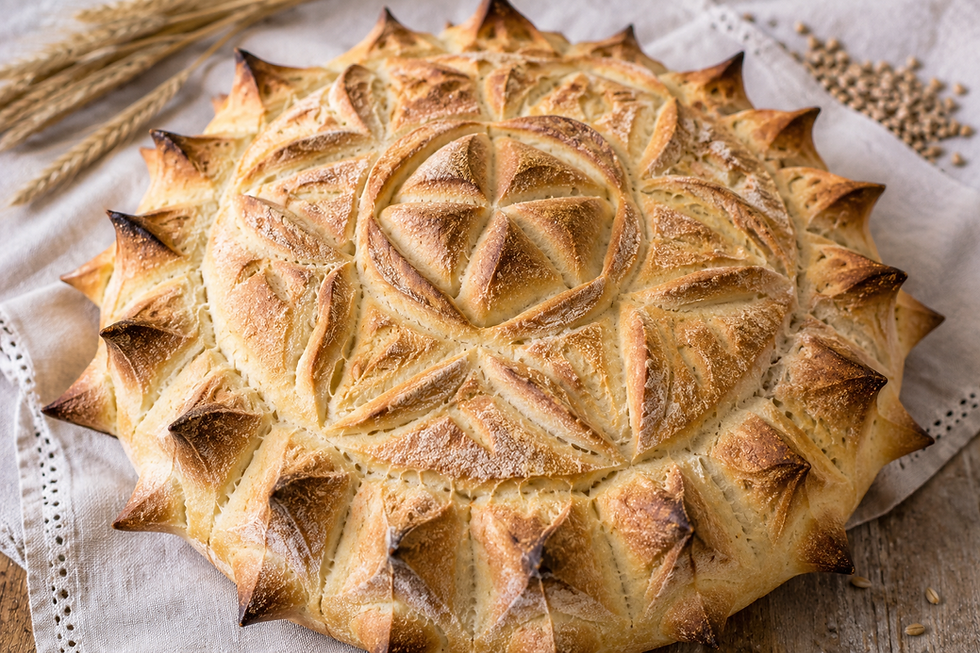
Pane coccoi is the bread Sardinians bake when an occasion is too important for an ordinary loaf. Two discs of stiff semolina dough are stacked and cut by hand with scissors into petals, leaves and small birds, then baked until the design turns the colour of dark honey.
It looks like sculpture, but it is honest bread: semolina, water, yeast and salt, a firm hand and a great deal of patience, torn apart at the table and shared.
Yield: 2 coccoi, 16 servings. Prep: 40 minutes. Rise: 1 hour 45 minutes. Bake: 45 minutes. Difficulty: intermediate. Course: bread for the antipasto table. Region: Sardinia.
The Story
Su coccoi, as it is called in Sardinian, is one of the great ceremonial breads of an island where bread making has always been closer to a craft than to housekeeping. Every occasion had its own shape: the wedding, the baptism, the Easter table, the feast of the village saint. The coccoi belongs to those days, and in many families a well made one still announces that something worth celebrating is about to begin.
The bread comes from the wheat. Sardinia has grown durum since antiquity, and the Campidano plain around Cagliari was a granary of the Roman world. Durum milled fine into semola rimacinata gives a dough that is golden, strong and slow to tear, which is exactly what a sculpted loaf needs. Before home ovens, women baked in the domed wood fired oven, su forru, often shared by a courtyard or a neighbourhood, and leavened the dough with su framentu, a piece of sourdough saved from the previous bake. Everyday Sardinian bread was made to keep for weeks, like the paper thin pane carasau of the shepherds. The coccoi is the opposite: soft inside, thin and crisp at the edges, made to be eaten the day it comes out of the oven.
The decoration is the language of the loaf. Wheat ears speak of abundance, birds of luck and fertility, flowers of the household, and the geometric cuts of the hand that made it. Each baker had her own repertoire, handed down from mother to daughter, and a decorated bread on the family table was a quiet statement of skill, and children learned by playing with scraps of dough. Some Easter versions bake a whole egg into the crown, a symbol of rebirth. Today the coccoi is also made for the pleasure of it, and it remains the most beautiful thing that can be made from flour and water on this island, dense, fragrant of wheat and worth eating slowly.
Making a coccoi was also a social act. On the eve of a feast, neighbours often gathered to knead and bake together, and the loaves were carried to the church or to the house of the celebration, where they were blessed, given as gifts or shared among the guests. To be given a coccoi was a mark of honour, and to be able to make one was the mark of a capable household.
Ingredients
For the dough
Semola rimacinata (finely milled durum semolina), 5 cups (800 g)
Lukewarm water, 1 2/3 cups (400 ml)
Instant dry yeast, 1 1/2 tsp (5 g)
Fine sea salt, 1 tbsp (18 g)
Extra virgin olive oil, for greasing the bowl, 1 tsp (5 ml)
For shaping and finishing
Cold water, for gluing the decorations, 2 tbsp (30 ml)
Large egg, beaten with 1 tbsp (15 ml) water, 1
Semola rimacinata, for dusting, 2 tbsp (15 g)
Dried currants, for the eyes of the birds, 6
Parchment paper, 1 sheet
Fine semolina, for the baking tray, 1 tbsp (10 g)
Notes on the ingredients
Use semola rimacinata labelled for bread, pale yellow and as fine as flour. It absorbs water slowly, so the dough seems dry at first and settles as it rests. If you keep a sourdough starter, replace the yeast with 1/2 cup (120 g) of active starter and extend the first rise to 3 hours. Choose fine sea salt, which dissolves fully in such a stiff dough, and an egg at room temperature, which spreads more evenly than a cold one. Black peppercorns work in place of currants for the eyes of the birds. Weigh the semolina rather than measuring it by cup, since cup measures of fine semolina can vary by 15 percent.
Preparation
Mix the stiff dough
Stir the yeast into the lukewarm water and let it sit for 5 minutes. Combine the semolina and the salt in a large bowl, pour in the yeasted water and mix with your hand until no dry flour remains. The dough will look crumbly and far too dry compared with ordinary bread dough. That is correct. Do not add water.
Knead until smooth
Turn the dough onto the bench and knead for 15 to 18 minutes by hand, or 10 minutes in a stand mixer with the dough hook on low speed. Lean into it with the heel of your hand. Around the 8 minute mark the surface changes from rough to satin, and by the end the dough should be smooth, dense and springy, with no cracks. Weigh it and divide it into two equal pieces.
Let the dough rise
Shape each piece into a ball, cover it with an upturned bowl or a well wrung damp towel, and leave it at 75°F (24°C) for about 1 hour. It will not double. It should grow by roughly a third and feel a little softer when pressed.
Shape the base and the crown
Line a tray with parchment. Take one ball and set aside a quarter of it, covered. Flatten the larger portion into a disc about 9 inches (23 cm) across and 3/4 inch (2 cm) thick, and place it on the tray. Roll the reserved quarter into a smaller disc about 5 inches (13 cm) wide. Brush the centre of the base with cold water and set the small disc on it, pressing gently so the two layers grip. Keep every offcut under the bowl.
Rest the shaped loaf
Cover the tray loosely and let the coccoi rest for 30 to 40 minutes, until it has puffed slightly and a fingertip pressed into the edge leaves a mark that fills back only slowly. This partial rise is the moment to cut. Heat the oven to 375°F (190°C) while you work.
Cut the design with scissors
Use small, sharp scissors. Snip around the rim of the base at 1 inch (2.5 cm) intervals, cutting inward about 3/4 inch (2 cm) and lifting each cut piece slightly to form a petal. Do the same on the crown, working in a spiral. Roll offcuts into a small ball for the centre, a few thin leaves and a bird made from a teardrop of dough, nipped at the tail and beak, with a currant pressed in for the eye. Glue each piece on with a dab of cold water.
Glaze and bake
Brush the whole surface lightly with the egg wash, taking care not to let it pool in the cuts. Bake on the middle rack for 40 to 45 minutes, until the crust is deep golden brown and the loaf sounds hollow when tapped underneath. The internal temperature should reach 205°F (96°C). If the petals colour too fast, tent them loosely with foil after 25 minutes.
Cool the loaf
Slide the coccoi onto a wire rack and leave it completely undisturbed for at least 40 minutes. The crumb is still setting inside and cutting it earlier will make it gummy. Repeat the shaping and baking with the second piece of dough, or bake both together on two racks.
Plating
Serve the coccoi whole, warm or at room temperature, on a wide wooden board, so the design is seen before it is broken. Set it in the middle of the table and let guests tear off petals and pieces by hand, as Sardinian custom prefers. If it must be cut, use a serrated knife and slice the base into wedges without pressing down on the crown, and offer the crisp petals first, since they are the best part.
Surround it with what the island offers alongside bread: wedges of aged pecorino sardo, thin slices of cured ham and salsiccia, black olives, ripe tomatoes dressed with olive oil, and a small bowl of good oil for dipping. Keep the board free of anything wet that could soften the thin crisp edges.
Professional Technique
Everything in this recipe follows from one decision: the dough is hard because the design has to stay. A coccoi is cut with scissors and modelled by hand, and a soft dough would lose every snip as it rises, the petals slumping and the birds melting back into the loaf. So the hydration is low, around 50 percent of the flour weight, against 65 to 75 percent for a common loaf. It is a dry, dense dough that feels almost like clay.
A dough this stiff does not come together by itself. The gluten needs mechanical work, which is why the kneading runs to 15 minutes or more. You are not developing an open crumb but a smooth, tight, elastic mass that will hold a sharp edge. The dough must also stay covered at every stage, because a stiff dough dries and cracks far faster than a wet one, and a skin that forms before the modelling is finished will split under the scissors.
The timing of the cuts matters as much as the dough. Cut at the beginning, when the dough is freshly kneaded and tense, and the gluten pulls the edges back together and the fermentation swells the loaf until the cuts blur. Cut after the loaf has fully risen, and the scissors deflate it. The right moment is the partial rise, when the dough has relaxed but still has most of its rise ahead, so the cut edges open cleanly and only soften a little.
Baking follows the same logic. A moderate oven, 375°F (190°C), makes the loaf rise gently rather than explosively. A hot oven would drive violent oven spring, puff the loaf and close the design, while browning the thin petals long before the centre is baked.
Texture and Moisture Control
The goal is a fine, dense, evenly golden crumb under a crust that is hard on the petals and only lightly crisp on the base. Semolina gives a crumb that is chewy and slightly sweet, closer to a tight country loaf than to a soft sandwich bread. Do not judge it by the large open holes of a wetter bread. A close, even crumb is the mark of a properly kneaded stiff dough.
Moisture is managed in three places. Before baking, the dough is covered so the surface stays supple. During baking, the egg wash creates a thin sealed film that colours and keeps the crust from drying to a stone. After baking, the loaf must cool uncovered on a rack, because trapped steam softens the crust and turns the petals leathery.
The thin decorated edges bake faster than the thick centre, which is why they are the first to darken. If they reach a deep brown early, foil brings them back into balance. Internal temperature is the reliable signal: at 205°F (96°C) the starch in the centre has set and the crumb will slice cleanly without any gumminess or dampness.
Professional Mise en Place
A coccoi is a calm recipe with one delicate moment, the cutting, so the organisation is about giving that moment your full attention.
Equipment and tools
Large mixing bowl or stand mixer with a dough hook
Small sharp scissors, kept for food use only
Rimmed baking tray, parchment paper and a wire rack
Pastry brush, kitchen scale and instant read thermometer
Bench scraper and a spray bottle to keep the cloths lightly damp
Prepared ahead
Dough kneaded and divided the same morning
Egg wash beaten, covered and chilled
Currants counted out and water for gluing ready in a small cup
Oven rack set to the middle position
Tray lined with parchment and dusted with a little fine semolina
Second portion of dough kept covered so it never dries while the first is baking
Service setup
Board wiped dry and warmed slightly
Cheeses and cured meats brought to room temperature
Serrated knife and a small bowl of olive oil beside the bread
Wines chilled: whites at 47°F (8°C), sparkling at 43°F (6°C), red at 60°F (16°C)
Board dressed with cheese, olives and tomatoes just before the loaf arrives
Chef Tips
Buy semola rimacinata, not coarse semolina for pasta. The fine milling is what makes the dough smooth enough to carve. If you can only find coarse semolina, blend it briefly in a food processor or mix it half and half with fine durum flour.
Practise the cuts on a scrap of dough before you touch the loaf. Hold the scissors nearly flat to the surface for long petals, and upright for short ones. A steady rhythm gives a more even pattern than any amount of care on a single snip.
Work quickly during shaping and keep every offcut covered. Dough that has dried even slightly will not stick with water and will flake off in the oven.
If your kitchen is cold, put the covered dough in the oven with only the light on. A steady 75°F (24°C) is better than a warm spot that swings up and down, and the oven light is enough to hold it.
Common Mistakes
Adding water because the dough feels dry. It is meant to. Extra water softens the dough and the design will collapse in the oven. Trust the kneading, and the dough will become smooth on its own.
Cutting too early or too late. Cuts on fresh dough close up, and cuts on a fully risen loaf deflate it. Wait for the partial rise and a slowly recovering fingertip mark, then work steadily.
Baking in a hot oven. High heat makes the loaf balloon and darkens the petals before the inside is done. Stay at 375°F (190°C).
Pooling the egg wash. Egg that collects in the cuts bakes into a dark crust and hides the definition. Brush lightly and dab away any excess.
Slicing while hot. The interior is still setting, and the knife will squash the crumb. Let it cool for a full 40 minutes.
Crowding the design. Too many tiny elements bake into a blur. A few generous petals, leaves and one bird read far better than a hundred small cuts, and they are easier to make cleanly.
Wine Pairing
Vermentino di Gallura DOCG: The natural Sardinian partner. Grown on granite in the north of the island, it has a saline edge and crisp citrus acidity that cut through the olive oil and pecorino on the board. Its faintly bitter almond finish echoes the toasted semolina crust, while its body is firm enough to hold up to the density of the crumb.
Nuragus di Cagliari DOC: A light, high acid white from the plain that grows the wheat for this bread. Its green apple freshness and low alcohol keep the palate clean between bites of dense crumb and salty cheese, and it never competes with the flavour of the bread. This is the everyday bottle of the Cagliari countryside and the most natural glass at a village table.
Cannonau di Sardegna DOC: A young, unoaked bottling suits the salsiccia and cured ham on the board. Its soft tannin and dried herb notes meet the fat of the meat, while its warm red fruit sits comfortably against the sweetness of the baked semolina. Serve it slightly cool, at about 60°F (16°C), so the alcohol stays in balance and the fruit stays lively.
Trento DOC: A metodo classico sparkling wine for the festive side of the coccoi. Fine bubbles and bright acidity refresh the palate after aged cheese and cured meats, and the toasty yeast notes of the wine mirror the golden crust of the loaf. It also suits the gathering for which the bread is baked.
Storage & Reheating
The coccoi is best on the day it is baked. Keep the cooled loaf on the counter, uncovered and away from direct sun, for the first day, or loosely wrapped in a clean cotton towel, and eat it within 2 days. Do not seal it in plastic, which softens the crust and dulls the design. Refrigeration dries the crumb and turns it stale quickly, so it is not recommended.
For longer storage, freeze the cooled loaf whole in a freezer bag for up to 2 months. Thaw it at room temperature for 3 hours, then refresh it in a 350°F (175°C) oven for 10 to 12 minutes, until the crust crackles again. Slices can be toasted straight from frozen, and any stale end makes excellent breadcrumbs or a dry crouton for soups.
Nutrition
Per serving, based on 16 servings, about 2 1/2 oz (70 g) of bread each:
Calories: 185 kcal
Total Fat: 1 g
Saturated Fat: 0.2 g
Trans Fat: 0 g
Unsaturated Fat: 0.7 g
Cholesterol: 6 mg
Sodium: 440 mg
Total Carbohydrates: 36 g
Fiber: 2 g
Total Sugars: 0.5 g
Added Sugars: 0 g
Protein: 6.5 g
Lactose: 0 g
Principal micronutrients: iron, thiamin, niacin, folate, selenium, magnesium
These figures are estimates.


Comments