
Italian Piedmont Gianduja Nougat | Torrone Gianduia Piemontese

Torrone gianduia is the torrone that is not a torrone at all. There is no whipped egg white in it, no white aerated nougat, nothing that has to be beaten for hours over steam. What you are making is a solid slab of gianduia, the chocolate and hazelnut mass that Turin invented, poured over whole nuts and cut into bars. That single difference changes every technical decision in the recipe.
Yield: about 30 bars, roughly 2 lb (900 g) of finished torrone. Prep: 30 minutes. Work at the marble: 40 minutes. Setting: 12 hours. Total: about 13 hours 10 minutes. Difficulty: advanced. Course: dolce, petit four, Christmas confection. Region: Piedmont, Turin and the Langhe.
The Story
Gianduia was born in Turin out of a shortage. When Napoleon closed continental Europe to British shipping in 1806, cacao became scarce and expensive in a city that had been drinking and working chocolate since the Savoy court took it up in the sixteenth century. The Turin confectioners had one abundant local substitute in the hills a few hours south: the hazelnut of the Langhe. Grinding it to a paste and folding it into the little cacao they could still buy gave them a mass that went further, tasted richer, and stayed soft at room temperature.
The name arrived later, and it came from the theatre. Gianduja is the Piedmontese carnival mask, a peasant character in a tricorn hat with a red bow, the good natured face of Turin itself. In 1865 the house of Caffarel presented its wrapped hazelnut chocolate during carnival and let the mask hand them out. The givu, the little ingot shape the Turinese still call a gianduiotto, took the character's name and kept it. Michele Prochet, who worked with Caffarel in those years, is the figure usually credited with refining the roasting and grinding that made the paste smooth enough to work with.
Torrone in Piedmont has always been a separate tradition from the torrone of Cremona or Benevento. Those are built on honey and egg white, with hazelnuts or almonds set into a white nougat. Piedmont, sitting on both the hazelnut and the chocolate, went the other way and made its festive slab out of the gianduia mass instead. You still find it stacked in the Christmas markets of Turin, Alba and Cuneo, cut thick and sold by weight. The hazelnut that matters for it is the Tonda Gentile Trilobata, grown around Cortemilia and protected as Nocciola Piemonte IGP, a round nut with a thin skin and a sweetness that does not turn bitter against dark cacao.
Ingredients
For the gianduia mass
Dark chocolate, 62 percent cacao, finely chopped, 12 oz (340 g)
Milk chocolate, finely chopped, 4 oz (115 g)
Pure unsweetened hazelnut paste, Piedmont if possible, 7 oz (200 g)
Powdered sugar, sifted, 2 1/2 oz (70 g)
Cocoa butter, grated, 1/2 oz (15 g)
Fine sea salt, 1/8 tsp (0.5 g)
For the nuts
Whole toasted skinned hazelnuts, Tonda Gentile, 7 oz (200 g)
Whole blanched almonds, toasted, 3 oz (85 g)
For finishing
Neutral oil for the mold, 1 tsp (5 ml)
Unsweetened cocoa powder, 2 tsp (4 g), for the blade
Use couverture chocolate if you can get it, and read the label for cocoa butter alone with no added vegetable fat. Hazelnut paste means nuts and nothing else: any jar with sugar, milk powder or palm oil in it will throw the whole set out.
Preparation
Step 1
Prepare the mold and the nuts. Line a 9 by 5 inch (23 by 13 cm) loaf pan or a rectangular confectionery frame with baking parchment, wipe the parchment with the thinnest film of neutral oil and set it aside. Spread the hazelnuts and almonds on a tray and leave them somewhere warm, around 86°F (30°C), for twenty minutes. Nuts straight from a cold cupboard will pull heat out of the mass the second they go in and drag it below the working range.
Step 2
Melt the mass. Chop both chocolates fine and put them in a dry stainless bowl with the hazelnut paste and the salt. Set the bowl over a pan of barely steaming water, with the base clear of the water, and stir slowly with a spatula until everything has melted together and the mass reads 118°F (48°C) on an instant read thermometer. Do not go higher. Above about 122°F (50°C) the milk solids start to catch on the bottom of the bowl.
Step 3
Cool the mass and seed it. Lift the bowl off the pan, dry its base and keep stirring. When the mass has dropped to about 95°F (35°C), scatter in the grated cocoa butter and keep stirring steadily as the temperature falls to 80°F (27°C). Stirring is not optional here and it is not for smoothness. It is the mechanical work that makes the crystals form, and a mass left to sit still will cool to the same reading without ever setting properly.
Step 4
Bring it to the working temperature. Return the bowl to the steaming water for a few seconds at a time, lifting it off and stirring between each, until the mass reads 86°F (30°C). Creep up on it. Overshooting to 91°F (33°C) melts the crystals you just spent ten minutes building and sends you back to the beginning, which is why the last two degrees are done in bursts of five seconds rather than in one stretch on the heat.
Step 5
Run the spatula test. Dip the tip of a small offset spatula into the mass, shake off the excess and lay it on the counter in a room at about 68°F (20°C). Leave it three minutes. A tempered mass turns matte, sets firm and lifts cleanly off the metal with a dull click. If it is still tacky, streaked or glossy after five minutes, the temper failed. Bring the whole bowl back to 118°F (48°C) and start the cycle again.
Step 6
Fold in the sugar and the nuts. Sift the powdered sugar over the tempered mass and fold it in with a spatula in as few movements as you can manage, then add the warm hazelnuts and almonds and fold until every nut is coated. The mass will thicken and lose some of its shine in the bowl, which is normal. Work quickly and do not beat air into it: bubbles trapped now become visible holes on the cut face later.
Step 7
Fill the mold and settle it. Scrape the mixture into the prepared mold and press it level with the back of an oiled spoon, pushing it well into the corners. Lift the mold an inch above the counter and drop it flat five or six times to release trapped air, then run a palette knife across the top to flatten the surface. Cover the mold loosely with parchment rather than plastic wrap, which would trap moisture against the chocolate.
Step 8
Set and cut. Leave the mold at a steady 61°F to 64°F (16°C to 18°C) for at least twelve hours, in a dry cupboard rather than the refrigerator. When it is fully set, turn the slab out onto a board and peel the parchment away. Warm a long thin knife under hot water, dry it completely, dust the blade with cocoa powder and cut bars about 3/4 inch (2 cm) wide in one firm downward press rather than a sawing motion.
Plating
Serve the bars at 64°F to 68°F (18°C to 20°C) and never straight from cold storage. Chilled gianduia tastes of almost nothing, because the aromatic compounds in cacao and hazelnut only lift once the fat is close to melting. Take the tin out half an hour before it goes to the table.
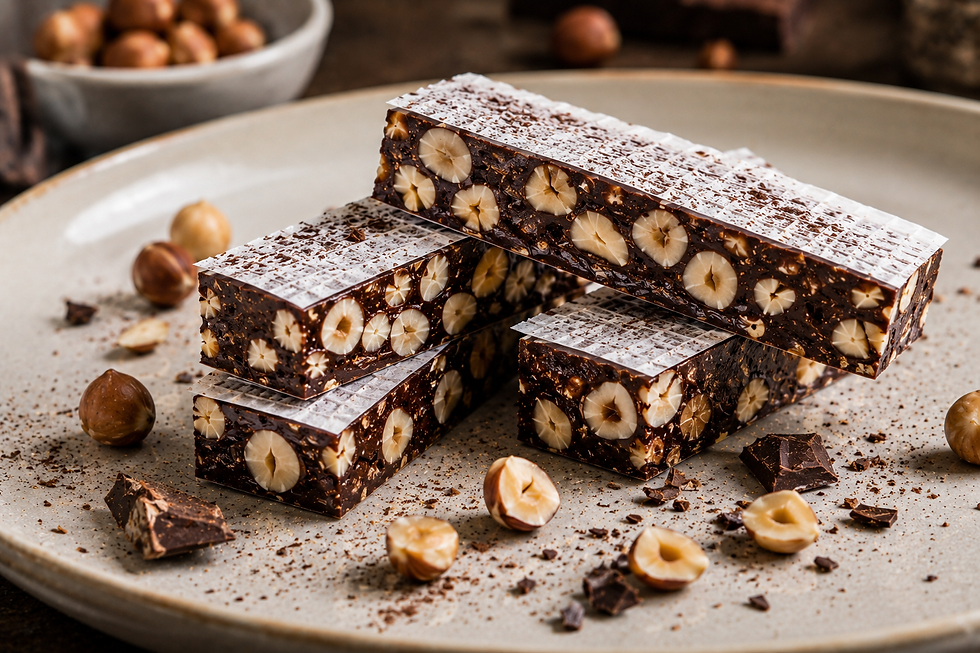
Present them on slate, dark wood or a marble slab, stacked in two short rows with the cut faces turned outward so the nuts show in cross section. Do not fan them out flat and do not dust the finished bars with cocoa or icing sugar, which hides the gloss you worked for. A few whole hazelnuts beside the stack tell the guest what is inside. For a plated dessert, lean one bar against a small quenelle of unsweetened whipped cream and add nothing else.
Professional Technique
Every other torrone on this blog is a meringue. Egg white is whipped, hot syrup or honey goes in, and the structure of the finished bar is that aerated protein foam holding nuts in suspension. Torrone gianduia has none of it. Take the egg white away and the only thing left to give the slab its body is the fat in the chocolate, which means the whole recipe stops being a matter of cooking and becomes a matter of crystallization. The technique that decides whether this works is tempering.
Cocoa butter can set in several different crystal arrangements, and they are not equally good. The one confectioners want is the tightest and most stable of them, the form that gives a hard surface, a high gloss and a clean break. Left to itself, melted cocoa butter does not choose it: it sets in looser arrangements that are soft, dull and unstable, and over the following days those slowly rearrange themselves and push fat to the surface as pale grey streaks. Tempering is the process of forcing the stable form to dominate before the mass sets.
The cycle does it in three moves. Heating to 118°F (48°C) wipes out every crystal already present, so you begin from nothing. Cooling to 80°F (27°C) while stirring builds a large population of crystals, both the stable form and the unstable ones. Warming back to 86°F (30°C) melts the unstable ones out again, since they have lower melting points, and leaves the stable seeds intact and evenly spread through the mass. Those seeds are what the rest of the fat copies as it sets. Skip the cycle and the slab comes out matte, streaked with pale bloom, soft under the knife and silent at the cut. Hit it and the bar snaps.
Texture and Moisture Control
The snap is the test. A correctly set bar breaks with a dry crack and shows a matte fracture inside, while a badly set one bends and smears. That break comes from a dense fat structure, and the enemy of it is heat arriving after the fact. Once the slab is cut, keep it away from warm shelves and out of direct sun, because a surface that partly melts and resets will lose its gloss permanently even if the interior stays sound.
Water is the other enemy, and there is almost none in this recipe by design. Melted chocolate will seize into a stiff grainy paste from a few drops of condensation, so every bowl, spatula and thermometer must be bone dry, and the bain marie should barely steam rather than boil. For the same reason the slab sets in a cupboard and not in the refrigerator: cold chocolate brought back into a warm kitchen pulls condensation onto its surface, and that thin film dissolves sugar and dries as a white haze.
Balance the nut load at about one third of the total weight. Less and the bars read as plain chocolate; more and the mass cannot hold them and the slab crumbles at the cut instead of slicing.
Professional Mise en Place
There is a window of about ten minutes between reaching the working temperature and the mass becoming too thick to level in the mold, so nothing can be prepared while the chocolate waits.
Equipment and tools
Instant read digital thermometer, accurate to one degree
Dry stainless bowl and a wide saucepan for the bain marie
Flexible silicone spatula, small offset spatula, palette knife
Loaf pan or confectionery frame, parchment, long thin slicing knife
Prepared ahead
Chocolate chopped fine and weighed, up to a week ahead in a sealed jar
Nuts toasted and skinned, up to 3 days ahead, held airtight
Mold lined, oiled and squared off before any heat goes on
Service setup
Kitchen at 64°F to 68°F (18°C to 20°C), no oven running nearby
Nuts warming at 86°F (30°C) and the sugar already sifted
Setting cupboard cleared, dry and free of onions or spices
Chef Tips
Buy a thermometer you trust before you buy better chocolate. This recipe lives inside a band of six degrees and a probe that reads two degrees high will ruin expensive couverture every single time.
Work on marble or granite if you have it. Stone pulls heat out of the mass evenly and lets you cool it by spreading and gathering it with a palette knife, which is faster and steadier than cooling in the bowl.
If the mass seizes into a dull stiff paste, stop. You cannot rescue it into torrone. Turn it into a hot chocolate base with milk instead and begin again with dry equipment.
Cut the slab the morning after, not the night you make it. A slab given a full twelve hours cuts cleanly, while one attacked after four hours drags at the blade and tears around the nuts.
Common Mistakes
Melting the mass too hot. Past 122°F (50°C) the milk solids scorch on the base of the bowl and give the finished bar a flat cooked note that no amount of good hazelnut covers.
Letting it sit still while it cools. The crystals form through movement, not through temperature alone. A mass cooled to 80°F (27°C) without stirring has no seeds in it and will set dull and soft.
Overshooting on the way back up. Warming past 88°F (31°C) melts out the stable seeds along with the unstable ones and cancels the entire cycle. Work in bursts of five seconds off the heat.
Setting it in the refrigerator. Chocolate chilled hard and then returned to a warm room collects condensation, and the white haze that dries onto the surface cannot be polished off.
Adding cold nuts. Nuts at cupboard temperature drop the mass several degrees on contact, thicken it before it reaches the mold and leave the corners underfilled.
Sawing the bars instead of pressing. A back and forth motion fractures a tempered slab around every nut it meets. Warm the blade, dry it and press straight down in one movement.
Wine Pairing
Moscato di Scanzo DOCG: The most precise match on the list. A sweet red from dried Moscato di Scanzo grapes in the hills above Bergamo, it carries rose, dried fig and a faint bitter almond edge, and its acidity is high enough to lift the fat of the gianduia rather than pile onto it. Crucially its tannin is fine and low, so it never clashes with the astringency of the dark cacao.
Recioto della Valpolicella DOCG: Made from grapes dried on racks until the sugars concentrate, this is the standard Italian answer to chocolate and it earns the place. The dried cherry and cocoa notes meet the 62 percent cacao on its own ground, while the sweetness is broad enough to carry the hazelnut. Serve it around 57°F (14°C): warmer and the alcohol starts to sharpen against the fat.
Vin Santo del Chianti Classico DOC: The choice for anyone who wants the nut rather than the cacao in the foreground. Long oxidative ageing in small barrels gives it walnut, toasted almond and dried apricot, and that nutty register runs straight alongside the toasted hazelnut instead of contrasting with it. Its acidity cuts the richness cleanly and the sweetness stays moderate.
Marsala DOC: Ask for a sweet Superiore or Vergine rather than a cooking bottle. The fortification gives it the weight to stand up to a fat slab that coats the palate, and its caramel, dried date and faintly salty finish answers the small amount of sea salt in the gianduia. Pour it in a small glass at cellar temperature, since the alcohol is the one element here that can overwhelm.
Storage & Reheating
Torrone gianduia keeps better than any other torrone and needs no reheating of any kind. Wrap the whole uncut slab in parchment, then in foil, and hold it in a dry cupboard at 61°F to 64°F (16°C to 18°C) for up to two months. Cut bars keep for a month the same way, laid in a single layer in a tin with parchment between the layers.
Keep it away from anything aromatic. Cocoa butter takes up the smell of coffee, spices and onions through paper and foil alike, and a bar stored beside them tastes of them within a week. Avoid the refrigerator entirely unless your kitchen runs above 77°F (25°C), and if you have no choice, seal the tin airtight and let it come back to room temperature unopened over three hours before you unwrap it.
Freezing works for the uncut slab only, double wrapped, for up to four months, and it must thaw sealed and slowly in the same way. Pale bloom on a stored bar is a cosmetic fault rather than spoilage: the torrone is still good to eat, but it has lost its snap.
Nutrition
Per bar, based on 30 bars:
Calories: 195 kcal
Total Fat: 15 g
Saturated Fat: 5 g
Trans Fat: 0 g
Unsaturated Fat: 9 g
Cholesterol: 2 mg
Sodium: 12 mg
Total Carbohydrates: 13 g
Fiber: 2 g
Total Sugars: 10 g
Added Sugars: 9 g
Protein: 3 g
Lactose: 0.4 g
Principal micronutrients: vitamin E, magnesium, iron, copper, manganese, phosphorus
These figures are estimates and move with the cacao percentage you choose and how thick you cut the bars.



Comments