
Italian Extra Soft Milk Cake Filled with Pastry Cream | Torta al Latte Morbidissima con Crema Pasticcera

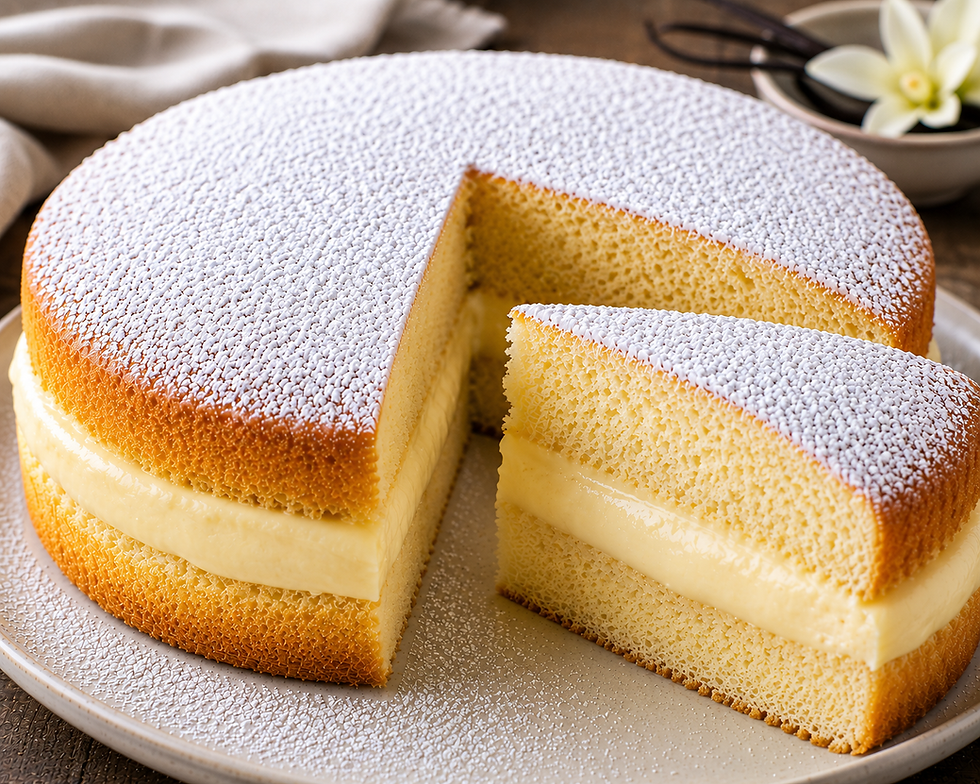
Torta al latte is the cake Italian households bake when the cupboard holds nothing but milk, eggs, flour and sugar. Splitting it and filling it with crema pasticcera turns a plain breakfast cake into something close to a pastry shop torta. Everything here is easy except one moment: cutting a cake this soft cleanly in two. That is the part this version is built around.
Yield: 10 slices. Prep: 30 minutes. Cook: 40 minutes. Chill: 3 hours. Total: about 4 hours. Difficulty: intermediate. Course: dolce. Region: central and northern Italy, household baking.
The Story
This cake has no region and no denomination, and that is the whole point of it. Italy has dozens of torte al latte, each one written into a family notebook rather than a cookbook, and all of them rest on the same decision: milk does the work that butter does in a French cake. Milk was the cheapest thing in the house in the dairy belt of Lombardy, Veneto and Emilia, delivered every morning by the latteria on the corner, and a batter built on it gives a crumb that stays soft for three days instead of firming overnight the way a butter cake does. When domestic ovens reached ordinary Italian kitchens through the 1950s and 1960s, that combination of cheap ingredients and forgiving method made these cakes the everyday dolce of the whole peninsula.
Crema pasticcera arrived from a different direction, out of the professional pastry shop. Pellegrino Artusi already recorded several versions of it in 1891, and the pasticcerie of the north built half their windows on the same gesture: take a pan di Spagna, split it horizontally, fill it with crema, dust it and sell it. Home bakers copied the gesture but kept their own cake, and that substitution is exactly why the filled torta al latte exists as a dish in its own right. A pan di Spagna is dry and firm and was designed to be cut. A torta al latte was designed to be soft, and softness is precisely the wrong quality for the job it is now being asked to do.
You can taste the difference against the Tuscan torta della nonna, which solves the same problem with pastry: a shortcrust shell holds the crema, pine nuts go on top, and nothing fragile is ever cut horizontally. The milk cake version refuses that shortcut. In Romagna the crema often takes a spoonful of liqueur, along the Adriatic the lemon zest becomes heavier, and in the south the milk is sometimes replaced in part by ricotta. What every version shares is the occasion: a birthday in a town with no pastry shop, a Sunday lunch, a child's merenda. It is a bakery cake made by somebody who is not a baker.
Ingredients
For the milk cake
All purpose flour, 1 3/4 cups (220 g), sifted
Granulated sugar, 1 cup (200 g)
Whole milk, 1 cup (240 ml), at room temperature
Eggs, large, 3, at room temperature
Sunflower oil, 1/2 cup (120 ml)
Baking powder, 2 1/2 tsp (10 g)
Fine sea salt, 1/4 tsp (1.5 g)
Vanilla extract, 1 tsp (5 ml)
Finely grated lemon zest, from 1 unwaxed lemon
Butter and flour, for the 9 inch (23 cm) pan
For the pastry cream
Whole milk, 2 cups (480 ml)
Heavy cream, 1/4 cup (60 ml)
Egg yolks, large, 5
Granulated sugar, 2/3 cup (135 g)
Cornstarch, 3 tbsp (24 g)
All purpose flour, 1 tbsp (8 g)
Lemon peel, in wide strips with no pith, from 1 lemon
Vanilla bean, split, 1, or vanilla extract, 2 tsp (10 ml)
Fine sea salt, 1 pinch
For finishing
Whole milk, 3 tbsp (45 ml), for brushing the cut faces
Confectioners sugar, 2 tbsp (15 g), for dusting
Unwaxed lemon, 1, for a little extra zest if you want it
Preparation
Infuse the milk for the cream
Put the milk, the heavy cream, the strips of lemon peel and the split vanilla bean with its seeds into a heavy saucepan. Bring it to the point where the surface trembles, then take it off the heat, cover it and leave it 20 minutes. Twenty minutes in hot milk extracts far more citrus oil than boiling for two, and boiling drives off the aromatics you paid for. Strain and return it to the pan.
Cook the crema pasticcera
Whisk the yolks with the sugar until pale, then whisk in the cornstarch, the flour and the pinch of salt with no lumps left. Pour in a ladle of the warm infused milk and whisk it smooth before adding the rest. Return everything to low heat and stir constantly, reaching into the corners of the pan, until the cream thickens and then cooks on another minute so it loses its floury taste.
Chill the cream flat
Scrape the cream onto a cold tray in a layer no thicker than an inch, lay film directly onto its surface so no skin can form, and refrigerate. A thin layer cools in under half an hour, while the same quantity left in the saucepan stays warm for hours and carries on thickening. Leave it at least 2 hours. It sets very firm, which is correct at this stage.
Mix the cake batter
Heat the oven to 350°F (175°C) and butter and flour a 9 inch (23 cm) round pan. Whisk the eggs with the sugar and salt for 5 full minutes, until the mixture triples and falls from the whisk in a ribbon. Pour in the oil in a thin stream while still whisking, then the milk, vanilla and zest. Sift the flour and baking powder over the surface in three additions and fold them in, stopping the moment the flour disappears.
Bake and cool completely
Pour the batter into the pan and bake for 38 to 42 minutes without opening the door for the first 25. The cake is ready when a skewer comes out dry and the surface springs back under a finger. Rest it 10 minutes in the pan, turn it out onto a rack, and leave it upside down for 5 minutes so the dome settles flat. Then cool it completely, at least 2 hours, and chill it for a final hour.
Level the top and split the cake
Trim the thin top crust off with a long serrated knife so you are left with open crumb on both faces. Measure the remaining height, halve it, and push toothpicks in around the whole circumference at that exact level, about 2 inches apart. Rest a long serrated blade or a taut length of strong cotton on the toothpicks and cut, turning the cake and working inwards a little at a time.
Fill, chill, dust and cut
Slide the top half onto a board or a tart base and set it aside cut face up. Brush both faces with the milk. Beat the cold crema smooth with a spatula, spread it over the bottom half in an even layer that stops a finger short of the edge, and lower the top half back on without pressing. Refrigerate 1 hour, dust with confectioners sugar just before serving, and cut with a thin blade wiped clean between slices.
Plating
Serve this cake cool but not cold. Half an hour out of the refrigerator is the right window: the crema loosens from set to spoonable, the lemon and vanilla come back into the nose, and the crumb regains its give. Straight from the refrigerator the filling is stiff and the aromatics are asleep.
Cut generous wedges, about an inch and a quarter at the outer edge, because a thin slice of a soft filled cake will not stand up on the plate. Lift each one with an offset spatula wide enough to take the whole wedge, never with the knife. Plate on white or pale ceramic so the band of pale yellow crema reads clearly against the crumb, and dust the plate itself with nothing. A spoonful of macerated strawberries alongside is the only addition worth making.
Professional Technique
Everything technical about this cake happens in the fifteen seconds when you cut it in half. A torta al latte crumb is very highly hydrated and very elastic, so under a blade it behaves like a sponge rather than a firm cake. A thin smooth knife compresses the crumb ahead of its edge, the cells collapse instead of parting, and from there the blade pushes instead of cutting: it drags the cake sideways and tears a ragged channel where you wanted a flat face. Use a serrated blade long enough to cross the cake in one pass, with almost no downward pressure.
Better still is a thread. Strong cotton or unflavoured dental floss, held taut and drawn through, has no thickness to displace and no flank to drag, so it parts the crumb rather than crushing it and leaves a face flat enough to hold cream without pockets. Either way the cake must be completely cold first. Warm crumb has not finished setting and is still full of steam, so it crumples ahead of anything you put through it, which is why a cake cut hot out of the oven tears every time.
The toothpicks are the other half of the technique. Pushed halfway into the side all the way round, every one measured to the same height from the base rather than judged by eye, they become a physical fence: rest the blade or the thread on them and the cut stays level even on a domed cake. And do not drive the blade towards the centre. Keep it at a constant depth, score a shallow ring, then turn the cake a quarter at a time and deepen that ring. Cutting a circle from the outside inwards keeps the plane true; pushing straight across sends the tip climbing.
Texture and Moisture Control
The elasticity that makes this cake difficult to cut is also what makes it worth eating, and it comes from the batter being a liquid emulsion rather than a creamed butter mixture. Oil stays liquid at every temperature it will meet, so the crumb never stiffens the way a butter cake does and it bends instead of snapping. The air comes from the eggs and sugar whipped to a ribbon, and the baking powder only finishes the job. This is why the oven door stays shut for the first 25 minutes: a collapse there leaves a dense compressed seam across the middle, exactly where the knife will travel later.
Cooling decides the rest. Ten minutes in the pan, then out onto a rack. A cake left to cool in its pan traps steam against the base, the bottom third turns gummy, and gummy crumb smears under a blade instead of cutting. The top crust is worth removing for the opposite reason: it is drier and tougher than the crumb beneath, so a knife meets sudden resistance and wanders off line. Dust the confectioners sugar only as the cake goes to the table, because on a cold moist surface it dissolves within twenty minutes.
Professional Mise en Place
This is a dish of long waits and one short critical operation, so the planning is about arriving at the cut with a cold cake and a cold cream. Both can be made the day before.
Equipment and tools
9 inch (23 cm) round cake pan, light coloured metal
Serrated bread knife longer than the cake is wide, or strong cotton thread
Wooden toothpicks, a ruler and a wire cooling rack
Heavy saucepan, balloon whisk, fine mesh sieve, flat tray for the cream
Offset spatula for lifting the cake halves and for plating
Prepared ahead
Crema pasticcera, up to 2 days ahead, chilled flat under contact film
Milk infusion, made and strained the day before if that suits you
Unfilled cake, baked and cooled the day before, wrapped whole
Lemon zested and peeled at once, zest covered so it does not dry
Service setup
Cake and cream both refrigerator cold before the cake is split
Board, toothpicks and knife or thread laid out before you cut
Filled cake resting 1 hour cold, then 30 minutes at room temperature
Sieve of confectioners sugar and hot water for wiping the blade
Chef Tips
If splitting the cake still worries you, bake the batter in two 7 inch (18 cm) pans for about 25 minutes instead of one 9 inch pan. You lose nothing but the bragging rights, and you gain two flat faces that were never cut at all.
Beat the cold crema with a spatula, not a whisk or a machine. A few firm strokes turn it from set to spreadable without folding air in. Whipped crema looks lighter on the spoon and then weeps liquid inside the cake within hours.
Weigh the flour if you own a scale. A cup scooped from the bag can carry an extra ounce, and in a batter this wet the gap between 220 g and 250 g is the gap between a crumb that bends and one that crumbles under the thread.
Save the trimmed top crust. Broken up, dried 10 minutes in the cooling oven and crushed, it makes an excellent crumb to press around the sides of the assembled cake, and it hides an imperfect join better than any amount of sugar.
Common Mistakes
Cutting the cake while it is warm. The single failure that ruins the dish. Warm crumb is soft and loaded with steam, and it crumples in front of the blade rather than parting. Cool the cake 2 hours, then chill it 1 hour.
Using a smooth knife instead of a serrated one. A smooth blade compresses this crumb, stops cutting and starts dragging. Use a long serrated bread knife or a taut thread, with the downward pressure close to nothing.
Pushing the blade towards the centre. Driving straight across makes the tip rise and the cut come out wedge shaped. Score a shallow ring, then rotate the cake and deepen it on every turn.
Spreading the crema to the very edge. Cream taken all the way out squeezes past the rim the moment the top goes back on. Stop a finger short and let the weight of the top half push it outwards.
Skipping the toothpick guides. Judging the halfway line by eye gives one thick layer and one thin one, and the thin one tears as you lift it. Measure the height, halve it, mark it all the way round.
Wine Pairing
Moscato d'Asti DOCG: The Italian household answer to a household cake, and still the best one. At around 5 percent alcohol it stays out of the way, its sweetness is moderate rather than heavy, and the acidity behind it keeps a mouthful of crema from sitting. The soft froth lifts the egg fat off the palate, and the grape and orange blossom aromatics land on the lemon zest in the crumb.
Recioto di Soave DOCG: Made from dried Garganega, so its sweetness is built on almond, acacia honey and candied citrus peel rather than tropical fruit. The Soave acidity survives under all that sugar, which is what stops it smothering the filling, and the bitter almond finish runs alongside the vanilla instead of competing with it. Serve it at around 50°F (10°C).
Malvasia delle Lipari DOC: Dried on frames in the Aeolian sun and far more concentrated than the two above: apricot, dried fig and orange peel, with real sweetness and a saline finish the islands give it. That concentration lets it stand beside five yolks instead of being erased by them, and the salinity is why the last mouthful does not cloy. Pour a very small measure.
Vin Santo del Chianti Classico DOC: The choice for anyone who finds fresh sweet wines cloying. Years of oxidative ageing in caratelli give walnut, dried apricot and a bitter almond edge in place of simple sugar, and the acidity is firm enough to cut straight through pastry cream. It is the only bottle here that contrasts with the cake rather than echoing it, which is exactly why it works.
Storage & Reheating
The assembled cake keeps refrigerated under a dome or in a closed container for 2 days, and it is best on the first. The crema on its own keeps 2 days in the refrigerator with film laid on its surface. The unfilled cake is the part that stores well: wrapped whole it holds 3 days at room temperature and freezes for 1 month, so bake it in advance and assemble on the day.
Nothing here is reheated. Take the cake out of the refrigerator 30 minutes before serving and that is the only warming it wants. Do not freeze the assembled cake or the cream alone, because pastry cream weeps water when it thaws and no amount of beating puts it back. An unfilled cake that has gone slightly dry comes back with 5 minutes at 300°F (150°C) and a brush of milk.
Nutrition
Per serving, based on 10 slices:
Calories: 390 kcal
Total Fat: 19 g
Saturated Fat: 4.5 g
Trans Fat: 0 g
Unsaturated Fat: 14 g
Cholesterol: 155 mg
Sodium: 180 mg
Total Carbohydrates: 49 g
Fiber: 0.6 g
Total Sugars: 32 g
Added Sugars: 30 g
Protein: 8 g
Lactose: 3.5 g
Principal micronutrients: calcium, riboflavin, vitamin B12, vitamin A, selenium, phosphorus
These figures are estimates. They shift most with the size of the slice and with how generously the sugar is dusted at the table.


Comments