
Italian Farro Salad | Insalata di Farro

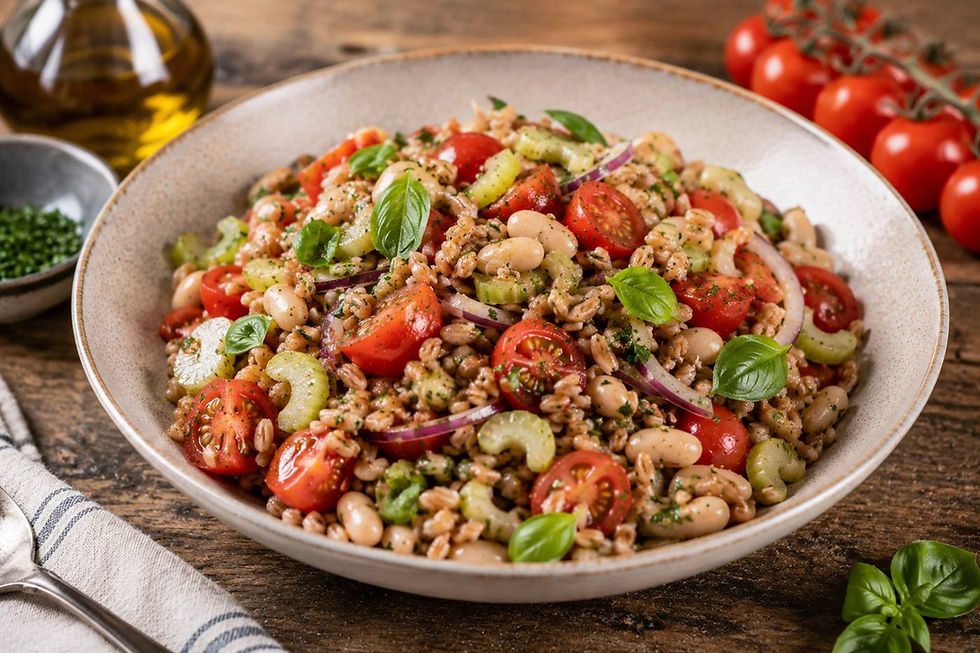
Insalata di farro is the grain salad Italy makes when the summer garden is at its loudest and the kitchen refuses to turn on the oven. Farro is the anchor: a hulled wheat with a firm, slightly chewy bite that holds its shape in a dressing instead of collapsing into paste the way softer grains do. Around it go tomatoes, zucchini, sweet pepper, olives, mozzarella and a great deal of basil, all bound by nothing more complicated than good olive oil, lemon and a whisper of raw garlic.
The dish lives or dies on two decisions. The first is how you cook the grain: farro is boiled in abundant salted water like pasta and drained while it still resists the tooth. The second is when you dress it. Farro absorbs dressing the way bread absorbs soup, so half the oil and acid goes on while the grain is still warm and thirsty, and the rest goes on at the very end. Everything else is chopping.
Yield: 4 servings. Prep: 20 minutes. Cook: 25 to 35 minutes. Rest and cool: 30 minutes. Total: about 1 hour 25 minutes.
The Story
This is the everyday national version of the farro salad, not a codified regional recipe with a protected zone and a fixed list. It lives in the refrigerated cases of gastronomie and rosticcerie from Rome to Bari, in the tubs that go down to the beach in August, and in the lunch an office worker carries from home. Nobody owns it, which is exactly its character: farro, whatever the garden gave that week, oil, acid and basil. A Tuscan puts in more tomato, a Pugliese adds cucumber, a Roman leans on olives and pecorino, and all of them are right.
Its lineage runs through panzanella and pasta fredda rather than through any mountain tradition. Italians had been eating cold dressed starch in summer for centuries, first as stale bread soaked in tomato juice, then as cold pasta once industrial pasta became cheap. Farro arrived in that same slot in the 1980s and 1990s, when vacuum packed pearled grain reached supermarket shelves and cut the cooking time to something a weeknight could absorb. It took hold because it is genuinely better cold than pasta, which turns gluey the moment it chills.
It is worth saying plainly what this dish is not. It is not minestra di farro, the thick Apennine winter soup of grain, beans and pork rind that gave farro its reputation in the first place. The grain in the bag may well have come from Tuscany or from the Umbrian hills, but the salad itself belongs to the whole peninsula and to the hot months. Everything in it is raw except the farro, and it is always served at room temperature, because cold flattens the olive oil and kills the tomato.
Ingredients
For the farro
Pearled farro, farro perlato, 1 1/2 cups (280 g)
Water, 6 cups (1.4 L)
Kosher salt for the cooking water, 1 tbsp (18 g)
For the salad
Cherry tomatoes, quartered, 1 cup (150 g)
Zucchini, small, cut into small dice, 6 oz (170 g)
Red bell pepper, small, cut into small dice, 5 oz (140 g)
Red onion, sliced paper thin, 2 oz (60 g)
Pitted Taggiasca or Kalamata olives, 1/2 cup (75 g)
Fresh mozzarella, drained and torn into small pieces, 4 oz (115 g)
Fresh basil leaves, 1/3 cup (10 g)
Flat leaf parsley, finely chopped, 2 tbsp (8 g)
For the dressing
Extra virgin olive oil, 1/4 cup (60 ml)
Fresh lemon juice, 2 tbsp (30 ml)
Red wine vinegar, 1 tbsp (15 ml)
Garlic clove, small, finely grated, 1
Kosher salt, to taste
Freshly ground black pepper, to taste
Preparation
Rinsing and boiling the farro
Rinse the farro briefly under cold running water, just long enough to wash off the dust from milling, then shake it dry. Do not soak pearled farro: the bran has already been abraded away, and soaking makes it cook unevenly and turn mushy at the edges. Bring the 6 cups (1.4 L) of water to a rolling boil, add the tablespoon of kosher salt and pour in the farro. Hold it at a steady, lively simmer, uncovered, stirring two or three times.
Judging doneness and cooling the grain
Start tasting at 20 minutes. Pearled farro is usually ready between 25 and 35 minutes depending on the harvest and how deeply it was pearled. It is done when the grain is tender through but still gives a distinct, springy resistance in the middle of the bite, like al dente pasta. Drain it immediately, spread it on a sheet pan in a single layer and let it cool for about 15 minutes. Do not rinse it under cold water, which strips away the seasoning it absorbed.
Cutting the vegetables
While the farro cooks, quarter the cherry tomatoes and set them in a bowl with a pinch of salt so they release juice, which goes into the dressing later. Cut the zucchini and bell pepper into dice roughly the size of a farro grain, about 1/4 inch (6 mm), so every spoonful carries the same proportions. Slice the red onion as thinly as you can and soak the slices in cold water for 10 minutes to pull out the harsh sulphurous edge, then drain and pat dry. Halve large olives and drain the mozzarella on paper towels.
Making the lemon and garlic dressing
Whisk the lemon juice, red wine vinegar, grated garlic and a generous pinch of salt until the salt dissolves, then add the juice the tomatoes have released. Pour the olive oil in slowly while whisking so the dressing thickens into a loose emulsion rather than separating. Grind in black pepper and taste it alone: it should be sharper and saltier than you want the finished salad to be, because the grain absorbs and mutes it.
Dressing the warm farro
Transfer the still faintly warm farro to a wide bowl and spoon over about half the dressing. Fold gently and leave it 10 minutes. Warm starch is porous and drinks the acid and oil right into the grain, which seasons the salad from the inside instead of only coating it. This is the difference between a salad that tastes of farro and one that tastes only of vinaigrette.
Assembling and final seasoning
Once the farro is at room temperature, fold through the zucchini, bell pepper, onion, olives and tomatoes. Add the remaining dressing, then the parsley and finally the mozzarella and the basil, torn by hand at the last moment so it does not bruise. Fold no more than four or five times, so the mozzarella stays in recognisable pieces. Correct salt first, then acidity with a few drops of lemon, then richness with a thread of oil, and rest the salad 15 minutes before serving.
Plating
Serve in a wide, shallow bowl rather than a deep one, so the salad sits in a loose layer about 1 1/2 inches (4 cm) deep and the colours of the pepper, tomato and basil stay visible. Spoon it, do not tip it: spooning keeps the grain aerated and separate. Reserve a few of the best basil leaves, some whole olives and a couple of mozzarella pieces for the surface, so the top reads as a summary of what is inside.
Finish with a thread of raw extra virgin olive oil poured in a spiral just before it goes to the table, and a final crack of black pepper. Serve at room temperature, around 68°F (20°C). If the salad has been refrigerated, take it out 30 to 40 minutes ahead, because straight from the cold the olive oil is dull and half solid and the tomatoes taste of nothing.
Professional Technique
The technical heart of this dish is treating farro as pasta, not as rice. Cook it in a large volume of well salted boiling water and drain it, rather than measuring a fixed ratio of liquid and letting it absorb everything in a covered pot. Absorption cooking forces you to guess the hydration in advance, and because farro varies enormously in how deeply it has been pearled, the guess is usually wrong: too much water and the grain bloats, too little and the centre stays chalky.
The second technique is split dressing, applied at two different temperatures. Between roughly 140°F and 100°F (60°C and 38°C), the gelatinised starch at the surface of the grain is still open and thirsty, and it will pull acid, salt and oil into the kernel. Below that, the starch retrogrades, the surface tightens, and anything you add simply sits on the outside. So half the dressing goes on warm to season the interior, and the other half goes on cold at the end, because the volatile aromatics in raw garlic, lemon and fresh olive oil would be driven off by the residual heat if they went in early. That split is why a properly made farro salad tastes seasoned all the way through rather than sharp on the first bite and empty on the second.
Texture and Moisture Control
Three ingredients in this salad leak water: tomatoes, zucchini and mozzarella. Left unmanaged they turn the bottom of the bowl into a pale, diluted broth within an hour. Salt the tomatoes early and capture the juice they release, then put that juice into the dressing where it belongs as flavour rather than letting it appear later as dilution. Leave the zucchini raw and do not salt it in advance, because salted raw zucchini goes limp and weeps continuously. Drain the mozzarella for at least 10 minutes and add it last, since acid draws whey out of fresh cheese quickly.
The grain itself is the moisture buffer. Farro drained at true al dente still has capacity to absorb, and it goes on taking up liquid for the first hour, which is why a salad that looks slightly dry at assembly looks correct at the table. Overcooked farro has no such reserve: it is already saturated, so extra liquid stays free in the bowl and the grain gives back nothing but starch, which makes the dressing cloudy. If the salad looks wet at service, do not add oil. Lift it out with a slotted spoon and season the drained salad again.
Professional Mise en Place
Nothing here benefits from being assembled more than 30 minutes before service, so the work splits between what can be done well in advance and what happens on the pass.
Equipment and tools
Large saucepan and colander for the grain
Sheet pan for cooling the farro in a single layer
Microplane for the garlic, small whisk and a sealed jar for the dressing
Wide mixing bowl, rubber spatula and a slotted spoon for service
Prepared ahead
Farro boiled, dressed warm with half the vinaigrette, cooled and refrigerated, up to 1 day
Full quantity of dressing whisked and held in a sealed jar at room temperature
Olives pitted and halved, up to 1 day ahead
Zucchini and pepper diced, onion sliced and soaked, tomatoes salted with their juice kept, up to 4 hours
Service setup
Dressed farro out of the refrigerator 30 minutes ahead to lose its chill
Mozzarella draining on paper towels, cold and covered until the last moment
Basil washed, dried and whole, torn by hand only at assembly
Dressing jar shaken to emulsify again, extra oil and lemon within reach
Wide shallow bowls at room temperature, never chilled
Chef Tips
Buy pearled farro, labelled farro perlato, and read the bag before you start. Semiperlato takes 40 to 45 minutes and whole farro decorticato needs an overnight soak and close to an hour, so substituting one for the other without adjusting the timing gives you either chalky grain or porridge.
Salt the cooking water as aggressively as you would for pasta. This is the only chance the grain has to be seasoned at its core, and no vinaigrette added afterwards reaches the centre of a kernel boiled in plain water.
Grate the garlic straight into the acid and let it sit five minutes before the oil goes in. The acid tames the raw bite, and you avoid the sharp fragments that ruin an otherwise clean dressing. Tear the basil rather than cutting it, since a blade bruises the leaf and turns the cut edges black within minutes.
Make one and a half times the dressing you think you need and keep the extra in a jar. Farro keeps drinking for hours, and a spoonful folded in just before the bowl leaves the kitchen brings back the lift that resting has absorbed.
Common Mistakes
Overcooking the farro. Once the grain loses its central resistance it cannot hold a dressing and the salad turns sticky. Begin tasting at 20 minutes and drain the moment the bite is tender with a springy centre.
Boiling it in unsalted water. The interior of the grain stays bland no matter how much you season the dressing afterwards. Use a full tablespoon of kosher salt in the pot, as you would for pasta.
Rinsing the drained farro to cool it fast. Cold water washes away the seasoning and the surface starch that helps the dressing cling. Spread the grain on a sheet pan instead and let air do the work.
Adding all the dressing at once, cold. The grain absorbs everything and the salad tastes flat by the time it reaches the table. Split it: half on warm farro, half at the end.
Serving the salad refrigerator cold. Cold mutes the tomato and stiffens the olive oil into a waxy film, and wet mozzarella straight from its brine makes it worse. Drain the cheese and bring the bowl back to about 68°F (20°C) before it goes out.
Wine Pairing
Vernaccia di San Gimignano DOCG: A firm mineral spine and a faintly bitter almond finish that echoes the nuttiness of the cooked grain rather than fighting it. Its moderate acidity carries the lemon and the vinegar without adding a second layer of sharpness, and its light phenolic grip cuts the oiliness of the olives cleanly.
Orvieto Classico DOC: The Grechetto and Procanico blend is soft and floral with white peach and a mild saline finish, which flatters fresh mozzarella and keeps the raw red onion from tasting aggressive. Serve it at 50°F (10°C) so its gentle acidity stays crisp against a room temperature salad.
Verdicchio di Matelica DOC: Grown in a cool inland valley in the Marche, this is the tenser, more linear face of Verdicchio, with high natural acidity and green apple and citrus peel aromatics. That acidity slices through the olive oil and resets the palate, while the bitter almond tail picks up the herbal edge of the parsley and basil.
Offida Pecorino DOCG: Pecorino carries more body and higher alcohol than most Italian whites at its price, with sage aromatics and a broad, almost waxy texture. That weight matches the substance of a grain salad, which a thin wine disappears behind, and its herbal register runs parallel to the basil and raw garlic.
Erbaluce di Caluso DOCG: A Piedmontese white with unusually high acidity and a stony, almost austere character. It is the bottle for when the salad is heavy on tomato and vinegar, because Erbaluce meets acid with acid instead of being flattened by it, and its low aromatic intensity leaves the vegetables in the foreground.
Storage & Reheating
Refrigerator: the assembled salad keeps 2 days in an airtight glass or stainless container. Do not use aluminium, which reacts with the lemon and the vinegar. After the first day the basil darkens and the mozzarella firms, so lift the salad out with a slotted spoon to leave the separated liquid behind, then refresh it with a spoonful of new dressing and fresh torn basil. If you expect leftovers, hold back the mozzarella and basil and add them per portion.
Freezer: cooked plain farro, without the vegetables, keeps 4 days refrigerated and freezes well for 3 months. Freeze it spread on a tray in a single layer, then bag it, so it does not set into a solid block. Thaw it overnight in the refrigerator and it is ready to dress. Never freeze the finished salad, since the tomatoes collapse and the mozzarella turns grainy.
Reheating: this is a room temperature dish and should never be reheated as a salad. Take it out 30 to 40 minutes before serving and let it come up to about 68°F (20°C), which is all the regeneration it needs. If you want a hot dish from leftovers, pick out the mozzarella and warm the rest in a wide pan over medium heat with a splash of vegetable stock for 3 to 4 minutes, then finish with fresh oil and basil off the heat.
Nutrition
Estimated nutrition per serving, based on 4 servings:
Calories: 540 kcal
Total Fat: 22 g
Saturated Fat: 5 g
Trans Fat: 0 g
Unsaturated Fat: 16 g
Cholesterol: 15 mg
Sodium: 620 mg
Total Carbohydrates: 74 g
Fiber: 10 g
Total Sugars: 8 g
Added Sugars: 0 g
Protein: 17 g
Lactose: 1 g
Principal micronutrients: iron 4 mg, magnesium 150 mg, potassium 720 mg, calcium 180 mg, vitamin C 55 mg
These figures are estimates. They vary with the brands used, the trimming of the vegetables and how generously the olive oil is poured.


Comments