
Italian Extra Soft Milk Cake with Ricotta Cream | Torta al Latte con Crema alla Ricotta

A torta al latte is the softest cake in the Italian home repertoire, and that softness is also its one weakness. Fill it with ricotta cream and the question stops being a question of flavour and becomes a question of load: how much wet cream a crumb this fragile can carry before it quietly sits down under the weight.
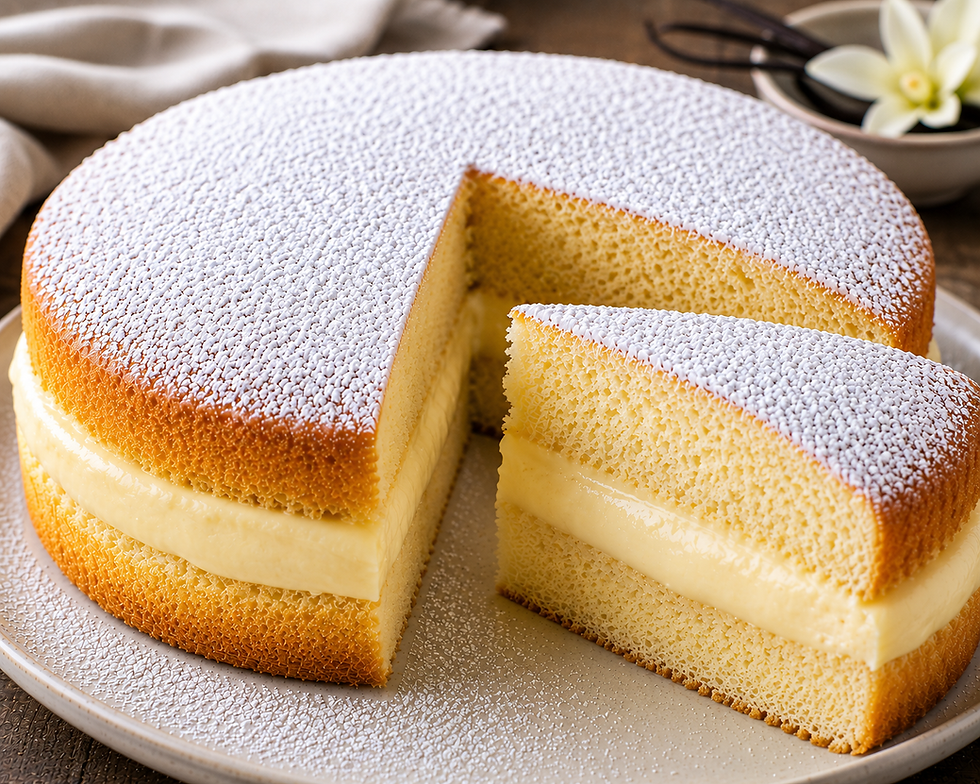
This version answers that with a measurement instead of a guess, and the cake reaches the table tall, level and clean at the knife.
Yield: 10 slices from one 8 inch (20 cm) cake. Prep: 30 minutes. Bake: 40 minutes. Cool: 2 hours. Chill: 3 hours. Total: about 6 hours including draining. Difficulty: intermediate. Course: dolce. Region: central and southern Italy.
The Story
Torta al latte belongs to the part of Italian baking that never passed through a pastry shop. It is a cake of the household ledger, built on what a family with a cow or a milk delivery always had, and its name says everything about it: milk is the ingredient that does the work, replacing most of the butter and all of the cream a northern European cake of the same size would need. It appears from Lombardy down to Campania in slightly different proportions and always with the same purpose, which is a tall, pale, extremely tender cake that keeps two or three days and needs no decoration. Northern households use melted butter and southern ones oil, and the difference shows less in the flavour than in how long the crumb stays soft.
The ricotta filling comes from a different tradition and joins it late. The name is literal: ricotta means recooked, and it describes the second heating of the whey drained off the day's pecorino or caciotta rather than anything about the milk itself. In the south that whey cheese was sold fresh every morning for very little money, because it could not be kept, and southern pastry built almost everything on that fact. Pastiera, cassata, cannoli and sfogliatella all exist because a sweetened, aromatised ricotta was cheap, available daily and needed no cooking at all to become a filling. Where a French kitchen reached for buttercream, a Sicilian or Campanian kitchen reached for the bucket that arrived at seven in the morning.
Putting the two together is a domestic move rather than a historical one, and it is exactly what an Italian family does on a Sunday or a name day: a plain cake baked the day before, split across the middle, and filled with whatever the cheese counter had that morning. It is never iced. Sheep ricotta gives the filling a faint grassy sharpness and holds its shape better; cow ricotta is milder, looser, and needs harder draining. Both are correct, and the choice is regional rather than technical. What is not optional is freshness: ricotta more than a couple of days old turns sour in a way no amount of sugar covers.
Ingredients
Buy the ricotta the day you bake, by weight from a cheese counter if you can, and weigh it again after draining. The quantities below assume a loss of about 3 oz (85 g) of whey.
For the milk cake
Large eggs, at room temperature, 4
Granulated sugar, 3/4 cup (150 g)
Whole milk, warmed, 1 cup (240 ml)
Sunflower oil, 1/3 cup (80 ml)
All purpose flour, 1 1/2 cups (190 g)
Cornstarch, 1/4 cup (30 g)
Baking powder, 2 1/2 tsp (10 g)
Vanilla extract, 2 tsp (10 ml)
Finely grated lemon zest, from 1 lemon
Fine sea salt, 1/4 tsp (1.5 g)
For the ricotta cream
Sheep or cow ricotta, 1 lb 2 oz (500 g) before draining
Powdered sugar, 1/2 cup (60 g)
Mascarpone, cold, 3 oz (85 g)
Heavy cream, cold, 1/3 cup (80 ml)
Vanilla extract, 1 tsp (5 ml)
Finely grated orange zest, from 1/2 orange
For the milk syrup
Whole milk, 1/4 cup (60 ml)
Granulated sugar, 1 tbsp (12 g)
For finishing
Powdered sugar, for dusting, 1 tbsp (8 g)
Candied orange peel, finely chopped, 1 tbsp, optional
Preparation
Step 1

Drain the ricotta first, because everything else waits on it. Line a sieve with a double layer of cheesecloth, set it over a bowl, tip in the ricotta, fold the cloth over and rest a small plate on it. Refrigerate at least 4 hours and preferably overnight. It should give up around 3 oz (85 g) of whey and come out at roughly 14 oz (400 g). Weigh it and write the figure down.
Step 2

Whip the eggs and sugar to a ribbon. Put both in a stand mixer and run the whisk at high speed for 8 to 10 minutes, until the mass has tripled and a lifted whisk leaves a trail that stays legible for three seconds. Add the vanilla and lemon zest in the last thirty seconds. This foam, not the baking powder, makes the cake tall, and it is the only thing keeping the crumb open enough to stay tender for two days.
Step 3

Warm the milk and combine it with the oil. Bring the milk to about 105°F (40°C), no hotter, and whisk the sunflower oil into it until it looks cloudy and uniform. Warm liquid folds into an egg foam with far less deflation than cold, which stiffens the fat and makes you stir harder. Keep it beside the mixer and whisk it once more before it goes in.
Step 4

Fold in the dry ingredients, then the milk. Sift the flour, cornstarch, baking powder and salt together twice. Fold them into the foam in three additions with a large spatula, cutting down the middle and turning the bowl a quarter turn each time, stopping the moment the last streak of flour disappears. Now pour the warm milk and oil down the side of the bowl in a thin stream, folding as you go.
Step 5

Bake at 325°F (165°C) for 40 to 45 minutes. Use an 8 inch (20 cm) round tin, base lined with parchment, sides greased and lightly floured. Pour the batter in from low down to avoid trapping large bubbles, level it and put it straight into the oven. Do not open the door before the 30 minute mark. It is done when a skewer comes out clean and the surface springs back. Cool 15 minutes in the tin, then 2 hours on a rack.
Step 6

Make the syrup and split the cake. Heat the milk with the sugar until it dissolves, then cool it completely. Shave the dome off with a long serrated knife so the top sits flat. Split the cake horizontally but not through the centre: leave the bottom layer noticeably thicker, because it carries the load. Brush both cut faces with syrup, no more than a tablespoon each, and let them stand ten minutes.
Step 7

Build the cream, weigh it, and fill. Push the drained ricotta through a sieve, then beat it smooth with the powdered sugar, mascarpone, vanilla and orange zest. Whip the cold cream to soft peaks and fold it in. Weigh about 12 oz (340 g) onto the base layer, spread it level at a scant 3/4 inch (2 cm) and stop 1/2 inch (1 cm) short of the edge. Set the top layer on, press once with a flat tray, chill 3 hours.
Plating
This cake is served in slices from the whole, at the table, and the presentation is a matter of the cut. Take it out of the refrigerator 20 minutes ahead so the ricotta loses its chill while the filling stays firm, then dust the top through a small sieve at the last moment. Dusted early on a surface this moist, the sugar dissolves into damp grey patches within half an hour.
Cut with a long thin blade warmed in hot water and wiped dry between slices, pulling it through in one movement rather than sawing. Ten slices from an 8 inch (20 cm) cake gives a wedge that stands up; eight gives one wide enough to lean. Use cool plates and add nothing wet alongside. A little candied orange peel beside the slice is the only garnish this cake wants.
Professional Technique
The question here is not how to bake the cake but how much cream it can carry, and it has a numerical answer. A milk cake batter is very wet and heavily aerated, so the set crumb is mostly air held in a thin web of gelatinised starch and egg protein kept soft by milk fat, and that web has almost no compressive strength. A filling is a dead load. Where a genoise stiffened with more flour resists it, this crumb deforms: the upper half settles within an hour, the sides bulge, and the slice loses its shape at the knife.
Two measurements keep it standing. Height first: the filled layer should never exceed one third of the finished height. On an 8 inch (20 cm) cake levelled and split that height is about 2 3/4 inches (7 cm), so 3/4 inch (2 cm) of cream is the limit. Weight is the more reliable measure, since it survives a change of tin. A firm sponge carries a filling of about half its own weight; a crumb this open stays near one third, so a cake of 1 lb 10 oz (740 g) takes about 12 oz (340 g).
Ricotta lowers the limit again, and the reason is water. Drained ricotta still runs to about 70 percent water, and its body is a loose curd that yields under pressure rather than setting like a custard. It also keeps releasing whey as the cake stands, so a seam that looked right at midnight is wet by lunch. Drain hard and weigh afterwards, build the body with mascarpone and a little whipped cream, which add fat without free water, and keep the sugar modest. For ricotta, one quarter of the cake weight is the target and one third the ceiling.
Texture and Moisture Control
The crumb has to stay damp without turning wet, and the bake and the syrup decide it. Pulled a few minutes early, the starch at the centre has not set and the middle sinks as it cools, which reads as sogginess but is undercooking. Left five minutes too long, the high milk content darkens the crust and the edges dry first. The syrup then replaces only what the cut faces lost: a tablespoon each is the whole quantity, and brushed on heavily it turns the layer next to the filling to paste.
On the filling side the control is temperature and time. Ricotta cream firms in the refrigerator because its fat crystallises, not because anything sets, so the three hour chill is what makes the cake sliceable and the 20 minutes out of it is what makes the filling taste of anything. Past about 36 hours the curd has released enough whey that the seam turns visibly wet however well it was drained. Leaving a 1/2 inch (1 cm) clear border is part of the same control: as the top layer settles, the filling reaches the edge on its own rather than being pushed out of it.
Professional Mise en Place
The draining and the cooling are the long poles here, so the work splits naturally across two days with almost nothing left for the end.
Equipment and tools
Digital scale, needed for the ricotta and for the cream, not optional
Stand mixer with a whisk, or a hand mixer and patience
Sieve and cheesecloth for draining, plus a second fine sieve for smoothing the ricotta
8 inch (20 cm) round tin, parchment, long serrated knife, long thin slicing knife
Offset spatula and a flat tray for pressing the top layer
Prepared ahead
Ricotta draining under a weight, overnight, refrigerated
Cake baked and cooled, up to 1 day ahead, wrapped once cold
Milk syrup made and cooled, up to 3 days ahead, refrigerated
Orange and lemon zested the same day, kept covered
Service setup
Cake filled and chilling at least 3 hours before service
Cake out of the refrigerator 20 minutes before the first slice
Powdered sugar in a small sieve, dusted at the table
Jug of hot water and a cloth for wiping the blade between slices
Chef Tips
Weigh the cake before you split it and write the number on a strip of tape on the tin. Every decision about the filling follows from it, and if you bake in a 9 inch (23 cm) tin the height changes but the ratio does not.
If the ricotta refuses to drain, it is almost certainly a stabilised tub with added gums, and time under a weight will not fix it. Add 2 oz (55 g) more mascarpone and drop the whipped cream to reach similar body.
Split the cake cold, straight from a wrapped night in the refrigerator, even though it is served nearer room temperature. A chilled crumb cuts cleanly along a level line; a warm one tears.
Press the top layer once, gently, with a flat tray rather than your hands. One even push seats it across the whole surface, removes the air pocket over the centre, and tells you immediately whether the filling was too thick.
Common Mistakes
Using ricotta straight from the tub. Undrained ricotta carries enough free whey to soak the crumb from the inside within an hour. Four hours under a weight is the minimum and overnight is better.
Making the filling too thick. This is the commonest failure and the reason the cake sits down in the middle. Keep the filled layer at or under one third of the finished height, and weigh the cream instead of spreading by eye.
Sweetening the ricotta heavily. Sugar pulls water out of the curd overnight, so a filling that was firm at the start loosens while the cake chills. Half a cup of powdered sugar is the ceiling here, and the orange zest does more for the flavour.
Splitting the cake while it is still warm. The crumb tears instead of cutting, the layers come out uneven, and residual steam condenses under the filling. Cool it fully and cut it cold.
Dusting the powdered sugar early. On a surface this moist it dissolves into damp patches within half an hour. Dust through a sieve at the table.
Wine Pairing
Moscato d'Asti DOCG: The safest match and the most Italian one. Its light frizzante bead scrubs the fresh dairy fat off the palate between mouthfuls, which no still sweet wine can do, and at around 5 percent alcohol it never overpowers a cake this delicate. Its peach and orange blossom notes land on the zest in the filling.
Recioto di Soave DOCG: Dried Garganega, and the better bottle for anyone who finds Moscato too floral. The grapes concentrate into apricot and candied citrus while keeping the acidity that cuts the mascarpone, and the bitter almond finish gives the pairing a savoury edge against a sweet curd.
Vin Santo del Chianti Classico DOC: An oxidative wine against a milk based cake, which sounds wrong and works. Years in small barrels build walnut, dried fig and caramel, notes that read as aged beside a filling this fresh and lactic, so each side sharpens the other. Its acidity stops the pairing turning heavy.
Romagna Albana DOCG: In its passito form this is the pairing with the most grip. Albana carries an unusual phenolic bitterness for a white grape, and that slight tannic pull is what stops a sweet ricotta coating the mouth. Apricot and honey behind it sit well with the lemon zest in the crumb.
Greco di Bianco DOC: The southern answer, from the Calabrian coast, and the closest in origin to a sheep ricotta filling. Sun dried Greco gives orange peel, dried herbs and a resinous bergamot note that follow the citrus in the cake, and its warm alcohol handles the mascarpone fat without much acidity.
Storage & Reheating
Once filled, the cake keeps refrigerated under a dome or loosely covered for 2 days and is noticeably better on the first. Do not wrap it tightly against the cut surfaces, which traps the whey the ricotta releases and turns the seam wet. The unfilled cake is the part that stores well: wrapped whole once completely cold it holds 2 days at room temperature and 4 refrigerated, so bake ahead and fill on the day.
Nothing here is reheated, but serving temperature matters as much as reheating would. Bring slices to around 64°F (18°C) for 20 minutes, since ricotta straight from the refrigerator tastes of almost nothing. Freeze only the plain unfilled cake, double wrapped, for up to 1 month, and thaw it overnight in its wrapping. Never freeze the filled cake or the cream alone: ricotta separates irreversibly and comes back grainy.
Nutrition
Per serving, based on 10 slices:
Calories: 340 kcal
Total Fat: 16 g
Saturated Fat: 6 g
Trans Fat: 0 g
Unsaturated Fat: 9 g
Cholesterol: 105 mg
Sodium: 210 mg
Total Carbohydrates: 39 g
Fiber: 1 g
Total Sugars: 24 g
Added Sugars: 20 g
Protein: 11 g
Lactose: 3.5 g
Principal micronutrients: calcium, phosphorus, riboflavin, vitamin B12, vitamin A, selenium
These figures are estimates. The discarded whey carries away part of the lactose and some protein, so the real values depend on how hard the ricotta was drained.


Comments